Sunday, October 31, 2010

Beyonce inspired mani

I found this look online, and I wanted to recreate it.  It is very easy, like every look I try out, LOL. It's inspired by one of Beyonce's tour looks, and also, she's been known for wearing metallic nails (she's a big Minx fan). I think this would be great for a night out, the color combination seems very club-like to me.  Of course, like always, you can switch the colors and add a little something to make it your own! Lets start...

First I used 2 coats of "Easel come, easel go!" from Finger Paints as a base.


Then, I used "Black expressionism", also from Finger Paints, to draw a vertical line right down the middle of the nail.  Since it was my first time, I took my time and did this very slowly to go as straight as possible.  I found this look alone very cool, and I will probably wear my nails just like that soon.


Now, the fun part.  Grab your base polish again, and dab off as much nail polish as you can from the brush, it needs to be almost dry.  Then, apply some random brushstrokes to your black stripe here and there.  Finish off with your favorite top coat to make it last, and you are done!  Neat, uh?

Friday, October 29, 2010

Walking into spiderwebs


This is what my sister requested today.  To be fair, she did her own nails, and used her own polish (Cloud 9, by Sinful Colors, and Lavender Cloud by Sally Hansen CSM) and she came up with the design, or saw it somewhere, and then I did the designs on her nails, so she deserves most of the credit.  

I used my Sally Hansen Nail Art Pen in Black Creme to trace the spider webs and the spider in the index finger, then a dotter to do the spider's eyes, first with the Lavender Cloud, then Stilleto Red by Rimmel. Finish up with a coat of Seche Vite top coat, and voila!  A spooky manicure for Halloween.
See the detail on the spider's eyes?

Anyways, have a happy halloween you guys!


Thursday, October 28, 2010

Vamp

This is what i'm wearing as a "Halloween Mani", it is not as out there as an Orange-Black combination, or as jack-o-lantern patterns, but I think of it as a bloody, vampy, more sophisticated version of a halloween mani.  I started out with blood red nails as a base (Remember I was wearing those Incoco decals?) but you can wear any color that you like, maybe a shimmery orange.  Then, for the crescent moons, I used a nail art pen from Sally Hansen in Black Creme.  Nail pens are very easy to use and you can create so many looks with them, the possibilities are endless! So basically you just draw a half circle in the upper area of your nail and fill it out with the black pen (or you can use some other nail polish brush, it's up to you).  Sorry about the small pics,  I couldn't find my camera so I had to use my phone.


I wore the crescent moon mani for a day, then I decided to add some dots to make it more fun, and this is the end result.


Very simple, but I got so many compliments at work! I hope you guys like it.  I think it looks great by itself, I added dots, but you can add maybe a cool decal, or a rhinestone, or you can invert the colors in one of the nails, use different colors, do a little something different so you can make it your own. 


Tuesday, October 26, 2010

Electric Zebra!

This look was inspired by my friend Rosy McMichael's latest youtube video, who had to create an "Electric Zoo" makeup look for a contest.  She has other great tutorials in her channel, you need to check it out.  You can see her videos HERE.
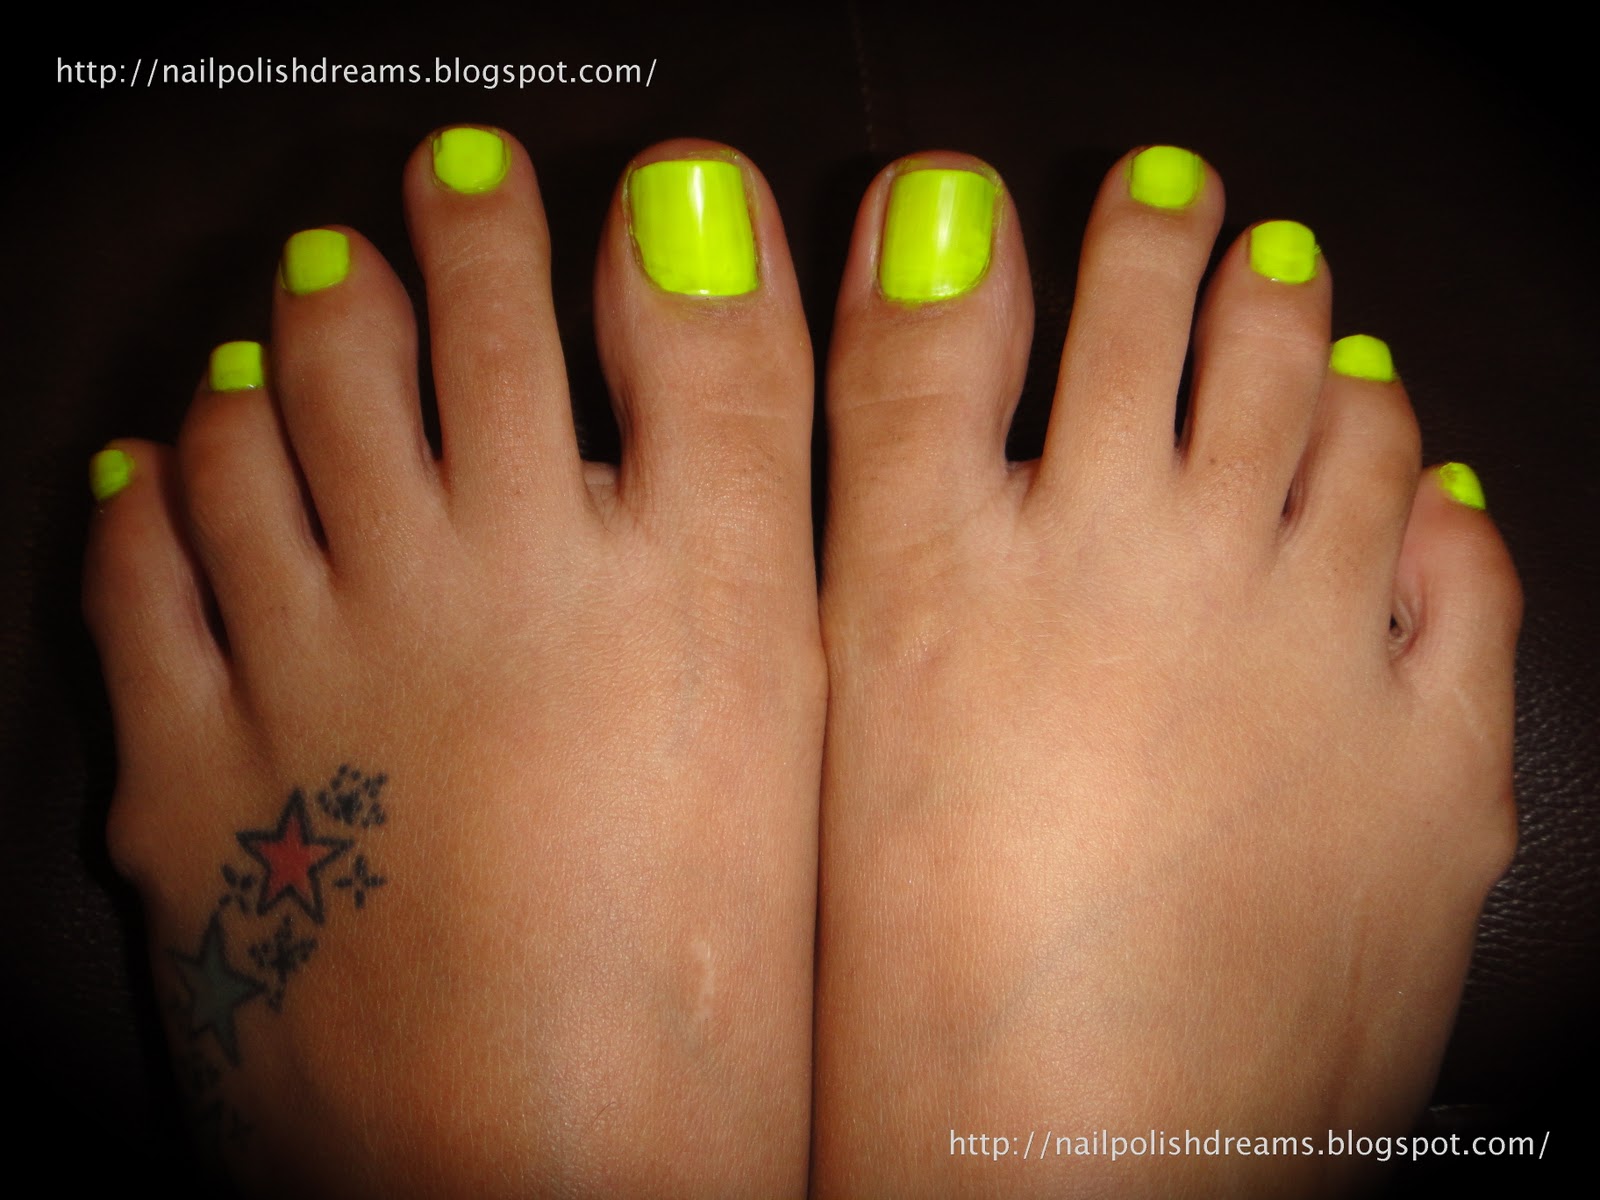
Now, I used my toes because my hands are still busy with the Incoco experiment thing, but PLEASE focus on the nails and not my actual feet (I don't really like the way my bones stick out from the sides and I'm not even going to address my scars...let's just say I'm a bit clumsy)
Anyways, I used Sinful Color's Neon Melon as a base.  The best way to describe this color is "highlighter yellow". It even applies like a highlighter! You are going to need 3 or 4 coats because it's very thin, but it dries fast, so it's not such a hassle.  Also, the color is very vibrant, so it is wort it.  Like most neons, it has a semi-matte finish, but if you don't like it you can use a topcoat over it and that should solve your problem. This is how the nail polish looks after 4 coats, very streaky!


Now, the good part: adding the zebra design!  This time, i'm going to use my Konad.  For those of you who don't know, Konad is a nail stamping system that is very popular and inexpensive. You can get it on ebay.  Konad also sells "special nail polish" to use with the stamping thingy and I must confess that I didn't believe this polish was really special at first, but then, when I actually started using it I realized that it makes it so much easier! If you're gonna go and buy the Konad, I highly recommend that you buy the special nail polish as well.  You can also use your own nail polish but not all of them work with it.  You need to experiment with them.


So this is how Konad works: You get an metal disc (image plate) of your choice, that contains about 5 different nail designs; once you choose your design, you brush a little nail polish in it, then you scrape the excess off.  Then, with a special stamp, you pick up the design and stamp it in your nail.  Sounds easy? That's because it is.  You just need a little bit of practice to learn how to do this fast, because you need to act before the nail polish dries.


After stamping in your nail, this is how it looks, VERY messy! Don't worry, we'll clean that later, when all the nails are done and everything is dry.  See how messy mine look?


Now, this is the final result.  Very simple, but I think the base color is already making a statement, and truth be told, I'm a bit lazy today :)


I used an OPI base coat , Sinful Colors Neon Melon as a base, Konad Special Nail Polish in Black for the zebra design, and Seche Vite as a top coat.  When using Konad you absolutely canNOT skip this part.  You need a good top coat that doesn't drag the nail polish, and you need to apply it with as few brush strokes as possible to protect the design.  Seche Vite always does the trick for me, I adore it!

That is all for today, I'll try to post very often, and if there's anything that you guys wanna see let me know! I can always use a little inspiration...

Monday, October 25, 2010

Polka Dot Mani

I sported this manicure last week and got a few compliments, so I decided to recreate it here...
I got the inspiration a couple of weeks ago, as I was standing in line in H&M. They had some posters in the cashier area and the models had something very similar on their nails.
For this one, I used Sally Hansen Complete Salon Manicure in Grey by Grey as a base, and Lavender Cloud for the dots.  I inverted the colors on the ring finger just for fun.
I used a dotter nail art tool for the dots.  You can buy it online, I think I saw them going for $3.00 in ebay, but if you guys can't get a hold of one, you can use stuff you have around your house like a toothpick, a bobby pin, or the fine point of a orange wood stick cuticle pusher.
It's a very easy way to spice up your nail polish, it looks great and it's inexpensive.
Now, the nail polishes... I ADORE both shades! They are super interesting and unique. What I don't like is the brush on these. It's rounded and thick, and it makes the application very difficult for me. The formula is awesome, almost opaque in one coat, but I always give it at least 2, just for peace of mind (I hate visible nail line).


Anyways, what do you think about it?  What other colors would look good together?

Sunday, October 24, 2010

Pink Before You Leap swatch

As you guys know, my nails are currently unavailable for new polish, as I am trying out the Incoco nail appliqués (see post below), but I borrowed my sister's hand to swatch this for you guys.
She wanted a "date night" mani, she really liked the way it looked on the bottle, and we are both OPI suckers, so she went for this one.  This is from the Brights collection, and it's a shimmery, nudish pink.  Looks gorgeous on the bottle, however, it looks slightly different on the nail, because it is very sheer.  It took 3 coats to look like this!
On the positive side, it is a very forgiving shade so I suppose you can wear this for the longest time because the little chips will go unnoticed. Very flattering to all skin tones as well.


This picture above was taken with flash, the one below with natural light.

How do you guys like it? How would you wear it?

Incoco Review


I've been intrigued by Minx nails for the longest time, without being able to try them, because there are NO nail salons that have them where I live.  The designs always look amazing, they seem convenient and very original.  
A few days back, I came across Incoco dry nail appliqué at my local drugstore.  They promise a professional looking mani that lasts up to 14 days, in minutes. The deal is, you need to buff and clean your nails before you apply it, then file off the excess paper.  For more info, go to www.incoco.com
I bought "Passion" which is a red creme that, truth be told, I found boring but I wanted to try them out and the store only had 2 or 3 creme shades.
Well, the application was no piece of cake.  While it's not very complicated, I thought it was going to be faster.  It probably took me the same amount of time as if I had applied liquid nail polish, maybe even more.  Also, since I'm new at this, my nails ended up with a few wrinkles, and when I was applying the paper, it kind of moved, so my sides are a bit jagged.  That was a drag, and as I was applying the nails, I had a bad feeling about them.  But when I was done, and took a long look at my nails, BAM! instant love!  They look perfect! They have the most amazing shine to them, the color looks intense, and they look very clean.  Now, this is my first day with them, I shall keep you updated about how they look as the days pass by.  So far, I think they look gorgeous.  See for yourselves.  

UPDATE: This is my fifth day wearing the appliqués.  So far, my free edges have chipped, but the wrinkles that I initially had disappeared within the first 24 hours and the nails looked perfect until yesterday.  I'm pretty sure the mani will look descent for quite some time, but I doubt I could go 14 days without changing it.  

Saturday, October 23, 2010

Welcome to my little blog!

Hello! My name is Martha, and I've been interested in makeup, nail polish and nail art for a while now.  I've been posting pics of my nails in my facebook and twitter accounts, and after receiving a few compliments from my beautiful friends, I thought: "Hey, why don't I start a blog?"  So I'll be posting here my experiences, reviews and how-tos.  I am also a big fan of a lot of nail blogs out there... these girls are talented! And I've learned a lot from them... I hope I can be of a little help to other nail enthusiasts like me.  Let me be clear: I am in no way NEAR professional, or even experienced! I'm just a normal girl, who likes pretty nails.  I buy my own stuff, and I will speak my mind.  Well I really hope you enjoy this... And if you do, show some love!